No edit summary |
(updated) |
||
| (12 intermediate revisions by 4 users not shown) | |||
| Line 1: | Line 1: | ||
| + | {{DISPLAYTITLE:Bedroom}} |
||
| + | |||
{{Infobox room |
{{Infobox room |
||
| − | |name = |
+ | |name = Bedroom |
|image = [[File:R31104.JPG|300px]] |
|image = [[File:R31104.JPG|300px]] |
||
| − | |items = [[Gun Powder A]] ( |
+ | |items = [[Gun Powder A]] (x2) (random)<br> |
| + | [[Gun Powder B]] (x2) (random)<br> |
||
| ⚫ | |||
| + | [[Winder Key]] (circumstances)<br> |
||
| ⚫ | |||
| + | [[Bezel Key]] (circumstances) |
||
| ⚫ | |||
| + | |enemies = [[Zombie]]s (x4)<br> |
||
| ⚫ | |||
| ⚫ | |||
| ⚫ | |||
| ⚫ | |||
| ⚫ | |||
| + | |OST = [[Cold Sweat (RE3)|Cold Sweat]] |
||
| + | }} |
||
| + | {{Nihongo|'''Bedroom'''|寝室}} is an area of the St. Michael Clock Tower. |
||
| ⚫ | This is the starting point after the arriving on the tram car, if [[Jill Valentine|Jill]] decides to jump from the window on the live selection screen. Two jars of [[Gun Powder A]] and two jars of [[Gun Powder B]] can be randomly found in |
||
| + | ==Description== |
||
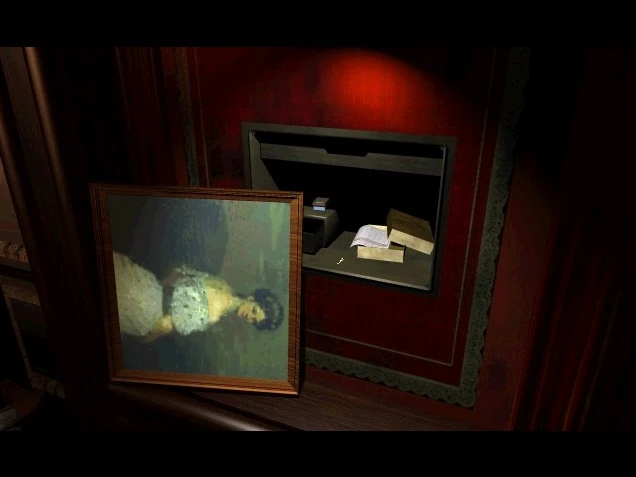
| ⚫ | [[File:Key behind the picture.jpg|thumb|left|Key behind the picture]]Also, a necessary key can be found in this room behind the picture. If this room is the starting point, than it'll be the [[Winder Key]]. And if the [[ |
||
| + | {{Empty section|room description|Resident Evil 3: Nemesis}} |
||
| + | |||
| + | ==Guide== |
||
| ⚫ | This is the starting point after the arriving on the tram car, if [[Jill Valentine|Jill]] decides to jump from the window on the live selection screen. Two jars of [[Gun Powder A]] and two jars of [[Gun Powder B]] can be randomly found in this room. If they don't appear in this area, they will be in the [[Clock Tower/Chapel|Chapel]]. After passing some distance from the crashed tram car a cutscene will occur, where four zombies coming out from the fire and trying to attack the character. |
||
| + | |||
| ⚫ | [[File:Key behind the picture.jpg|thumb|left|Key behind the picture]]Also, a necessary key can be found in this room behind the picture. If this room is the starting point, than it'll be the [[Winder Key]]. And if the [[Clock Tower/Courtyard|Courtyard]] are the starting point for Jill, than it'll be the [[Bezel Key]]. |
||
When playing as [[Carlos Oliveira|Carlos]], some monsters will re-appear here: another four [[Zombie]]s or two [[Zombie Dog]]s. |
When playing as [[Carlos Oliveira|Carlos]], some monsters will re-appear here: another four [[Zombie]]s or two [[Zombie Dog]]s. |
||
| + | ==Examines== |
||
| − | <gallery captionalign="left"> |
||
| + | {| border="0" cellpadding="1" cellspacing="1" class="article-table article-table-selected" style="width: 500px;" |
||
| + | |- |
||
| + | ! scope="col"|Location |
||
| + | ! scope="col"|Localization |
||
| + | ! scope="col"|Original Script |
||
| + | |- |
||
| + | |Broken door |
||
| + | |It's cracked and it won't open. |
||
| + | | |
||
| + | |- |
||
| + | |The small shelf (After the Key is taken) |
||
| + | |There's nothing more. |
||
| + | | |
||
| + | |- |
||
| + | |The Drawers |
||
| + | |Someone has made a mess inside the drawer. |
||
| + | | |
||
| + | |} |
||
| + | |||
| + | ==Gallery== |
||
| + | <gallery> |
||
Starting point.jpg|Starting point |
Starting point.jpg|Starting point |
||
| + | RE3 CT Bedroom 1.png |
||
| ⚫ | |||
| + | RE3 CT Bedroom 2.png |
||
| + | RE3 CT Bedroom 3.png |
||
| + | RE3 CT Bedroom 4.png |
||
| + | RE3 CT Bedroom 5.png |
||
| ⚫ | |||
| + | RE3 CT Bedroom 6.png |
||
| + | RE3 CT Bedroom 7.png |
||
| + | R31100.JPG |
||
| + | R31101.JPG |
||
| + | R31102.JPG |
||
| + | R31103.JPG |
||
| + | R31105.JPG |
||
| + | R31108.JPG |
||
</gallery> |
</gallery> |
||
| + | ==Bibliography== |
||
| + | *{{Cite book|title=[[BIOHAZARD 3 LAST ESCAPE OFFICIAL GUIDEBOOK]]|publisher=Famitsu|year=1999}} |
||
| + | |||
| + | ==Sources== |
||
| + | <references/> |
||
| + | {{Resident Evil 3: Nemesis locations}} |
||
[[de:Unfallstelle]] |
[[de:Unfallstelle]] |
||
| − | [[Category: |
+ | [[Category:Clock Tower]] |
[[Category:Resident Evil 3: Nemesis locations]] |
[[Category:Resident Evil 3: Nemesis locations]] |
||
Revision as of 12:04, 4 April 2020
Bedroom (寝室) is an area of the St. Michael Clock Tower.
Description
| This section is empty. You can help out the Resident Evil Wiki by adding to it. |
Guide
This is the starting point after the arriving on the tram car, if Jill decides to jump from the window on the live selection screen. Two jars of Gun Powder A and two jars of Gun Powder B can be randomly found in this room. If they don't appear in this area, they will be in the Chapel. After passing some distance from the crashed tram car a cutscene will occur, where four zombies coming out from the fire and trying to attack the character.

Key behind the picture
Also, a necessary key can be found in this room behind the picture. If this room is the starting point, than it'll be the Winder Key. And if the Courtyard are the starting point for Jill, than it'll be the Bezel Key.
When playing as Carlos, some monsters will re-appear here: another four Zombies or two Zombie Dogs.
Examines
| Location | Localization | Original Script |
|---|---|---|
| Broken door | It's cracked and it won't open. | |
| The small shelf (After the Key is taken) | There's nothing more. | |
| The Drawers | Someone has made a mess inside the drawer. |
Gallery
")
")
")
")
")
")
")
")
")
")
")
")
")
")
")
Bibliography
- BIOHAZARD 3 LAST ESCAPE OFFICIAL GUIDEBOOK. Famitsu. 1999.