The Garrador, which roughly translates as "the clawed one", were augmented human host's of Plaga; a parasitic organism native to Spain. To restrict their dangerous killing power and strengthen their hearing, their eyelids were stitched together and they were bound in cells.[1]
Characteristics
Appearing as a large armored gladiator-like warrior, with retractable claws grafted to each forearm, the Garrador is a dangerous and extremely aggressive enemy which has a high resistance to frontal attacks. The Garrador has two main weaknesses, the first is its lack of eyesight and the second is its visibly exposed Plaga erupting from its spine. Keep in mind though, that flashbangs will allow them to detect the player, and they will immediately charge. However, hitting the Garrador with an Incendiary Grenade will disable them.
The Garrador finds its prey by hearing, and will charge towards the origin of any loud noises in earshot, viciously swiping with its claws. Garradors are extremely dangerous and can kill a player in seconds if they are caught in the path of one of their rampages. If caught by a charge with medium low health, the Garrador will use a special death animation, where it plunges it's claws through the victim's face, followed up with a stab to the chest. Getting hit by a swipe with low health will also decapitate the character.
A easy way to defeat a Garrador is to try and trick them into turning their back on the player. Either by remaining quiet and waiting for the Garrador to go on patrol (it will retract its claws and start walking around the area, occasionally stopping to listen) whereby it may turn its back on the player allowing for a shot at its Plaga. Running makes noise that can alert the Garrador, but walking won't allow the player to simply walk around behind the Garrador. Another tactic is to stand by a wall or door and attempt to make the Garrador into charging the player. If timed successfully the player can move out of the way, the Garrador will plunge its claw into whatever surface the player was standing by, and the monster will become immobilized for a few seconds allowing another shot at its spine. This technique is also good when attempting to knife a Garrador.
Another method that uses more ammo is to shoot it in the stomach or leg with a powerful weapon (such as the shotgun or magnum) and run behind it to shoot the plaga. A great, but a bit slow, method is to have Ashley with you. Use the "Wait/Follow" trick so the Garrador can hear you. Move aside so the Garrador won't hit you then proceed to either knifing or shooting its back. The game also provides handy sources of sound for the player to employ in the form of tactically placed bells. For more details on these, see below. If the player tries to go back up the stairs the door closes and locks Ashley safely outside allowing the player to use the "Wait/follow" trick more easily without Ashley getting decapitated or impaled.Never try to throw a flash grenade on him then it will make him see you.You can use a frag or incendeiary grenade on him that will stun him for a while.
History
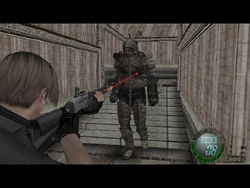
Castle prison cell
The first Garrador Leon encounters, is chained up inside a cell in one of the first rooms he passes through after penetrating the defensive walls of Salazar's Castle. Though restrained at first, it soon breaks its bonds as Leon enters the room and attacks him. In this battle, there are two bells in the dungeon where the Garrador is imprisoned. Using its sensitive hearing to his advantage, Leon discovers that the tolling of the bell will drive the Garrador to a state of rage, charging the bell and exposing it's vulnerable back, although the bells will shatter when stuck by the Garrador's claws. It is advisable to leave Ashley outside the door to the prison, as the Garrador will kill her with a single swipe. However if the player tries to leave the room the door will close locking Ashley safely outside.
Cage
Next, another Garrador is found in the room where the Hourglass w/Gold Decor is found. Soon after the cage in this room is lowered, this Garrador plunges into the fray, and Leon is forced to do battle with it to survive. The best tactic to use here is to toss a grenade towards one of the doors of the cage, or to employ a stun grenade, but make sure to do it before the Garrador lands (you can do this by skipping the cutscene), as flash grenades allow them to see you. This will stun the Ganados surrounding the cage, giving you a chance to blow the lock off one of the doors. Using the shotgun, TMP, or a grenade, try to open the door opposite of the one you entered through. Run back into the banquet hall and pick off the zealots that follow. By not shooting the near door, any Zealots in the cage, and the Garrador (assuming you didn't lag on your way out) will try to attack Leon through the bars, and you can safely shoot out of melee range. This Garrador will bang on whichever locked cage door still remains if it knows you're nearby. If it is still in the cage and the player is outside it will keep hitting the door until the lock breaks.
Ada Wong also fights another Garrador in the same location in Separate Ways.
Tower

The Armored Garrador sporting a more warrior-like and intimidating look.
The final Garrador is fought upon entering Salazar's Tower in a large room with several Zealots as well. There will be two on Normal and Professional Difficulty, however one of them is armored and is slightly more resilient than the normal Garrador, however it still retains the same weakpoint. It is the easiest to defeat of the two on easy mode due to the open spaces and the fact that it is incredibly easy to navigate around it for a shot to its back, provided you kill the additional zealots that will enter the room. Or just shoot a RPG between them and they will both die.
Hitset and Tactics
One way he brutally kills his prey is by lashing about blindly, decapitating an opponent. An alternative form of killing an enemy, is by throwing his claws into the face of his prey, then impaling the victim's torso, killing him almost instantly. Noting that piercing the brain doesn't necessarily result in instant death, the claw that is stabbed through the victim's head doesn't instantly kill them, so it must pierce a non-vital area of the brain. Once inside his berserker claws, it is quite difficult to maneuver out of his path.
The Mercenaries
The Garrador appears in Mercenaries on several stages; although limited to the Village and Old Castle, several appear on both survival missions. His sound effects from Resident Evil 4 have been replaced by new ones, although they aren't as recognizable as they where in RE4. The Garrador is also no longer capable of decapitating it's opponent, as The mercenaries 3D does not feature Decapitation of any sort. The attack is still present, but the player is simply knocked to the ground, dead, which can often come off a bit comical. Also, the attack that involves skewering the player's head on his claws and then stabbing them in the gut has also been modified. Instead of the blade actually piercing the player's skull, it appears to float above it, and no blood comes out (Perhaps to indicate that he as "grabbed" the player with his hand?). He then continues to stab the player in the gut with his free hand. Although more tactically-enhanced than in Resident Evil War, they are much more slow, giving the player time to evade it's charge.
Stages:
- 4-1 (Village, Daytime)
- 4-5 (Ship Deck - Round 15)
- EX-1 (Village, Night time)
- EX-4 (Castle, Daytime)
- EX-9 (Deserted Island, Evening - Round 10)
Tactics The Garrador is far easier to beat on Mercenaries 3D than in RE4; simply hitting it with an explosive will knock it to it's knees or the ground, and shooting a machine gun or a powerful weapon like a rifle or magnum into its weak point will kill it very quickly. Additionally, it can be easily defeated while its standing up; it will not respond to attacks while "looking" around, and a machine gun (especially HUNK's AK-47) will kill it easily. It compensates by frequently appearing with other sub-bosses, and only in 4-1 does it appear alone. In 4-5, EX-4 and EX-9, several will appear simultaneously (two, two, and three, respectively), with a Red Executioner Majini accompanying the two in EX-4. On EX-1, killing it immediately is especially crucial, as Super Salvador will appear the Garrador spawns, making combat difficult.
Resident Evil: The Deck Building Game


Garrador Infected card.
Garradors are an Infected card in in the Resident Evil DBG, introduced in the second set Alliance. Garradors do not have any effects but are particularly dangerous because of the uncommon amount of health they have. At 50 Health, it nearly equates with the "mid-boss" enemies such as Nemesis-T Type and the Proto Tyrant (T-001 Model) that have 60. Since the most common amount of health for Infected in the game averages around 40, it can raise the tension and make Exploring that much more of a risk. The amount of damage it deals is 40, putting it on par with some of the most powerful enemies in the game excluding the bosses of each set. If it is defeated it is worth 4 Decorations.
Gallery
")
")
")
")
")
")
")
")
")
Trivia
- The Locust Berserker, an enemy from the popular video game Gears of War, was influenced by the Garrador. Cliff Bleszinski (a.k.a. CliffyB), the creator of the Gears of War series, claimed to be a fan of Resident Evil 4. The Berserker is a massive blind Locust beast that seeks out its targets by sound and smell before charging at them, either trampling or bludgeoning anyone who doesn't move out of its path.
- A direct hit with a Rocket Launcher will instantly kill a Garrador even if shot at the front. This however does not apply in Professional difficulty, as two hits are needed to kill the armored Garrador.
- When Leon is impaled by the Garrador, he screams in pain, even though the claws go through the brain.
- It is the only enemy that can take Hand Cannon shots straightly into its body. However just a shot from a fully upgraded Handcannon directly to its Plaga will be enough to kill it.
- The Garrador's eyelids are sewn together, which (without need of acknowledgement) is what prevents it from seeing. The first Garrador Leon encounters is within what he suggests to be a prison, and the sewing of its eyelids could be a form of punishment. However, several Garradors are encountered later in the game being used as a means of offence against Leon and are clearly not prisoners. Thus, these later ones have no reason to have their eyesight taken from them as it severely hampers their effectiveness as soldiers (this is most likely just for gameplay reasons, as fighting a Garrador that could see would be extremely difficult, and achieving victory against an armored Garrador would be hopeless without the use of a rocket launcher). This may simply be an attempt by the Illuminados to control the monsters; given how dangerous El Gigante was to normal infected villagers, it'd make sense for them to take precautions with the arguably more deadly Garrardor.
- In the Mercenaries 3D, the Garrador is the only sub-boss that does not explode upon death. Instead, it disintegrates like a normal enemy.
- Though the garrador is tough, when it is available, the Mine Thrower is quite useful when fighting the first and second Garradors because one shot to the plaga on the back of it will kill it instantly (but when fighting the two in the tower it takes more than one shot).
- The fact that the Garrador is blind and that it uses its hearing to locate its prey makes it similar to the Licker.
- The Garrador drops a ruby when defeated by Ada in the Separate Ways scenario.
- In the Mercenaries, Garradors can hear the suppressed Silver Ghost.
- It is possible that Garradors were blinded in order to intensify their hearing, which is so it can hear Leon running.
- Garradors are immune to flash grenades and will charge the player upon usage.
- The player should note that some terrains give either a tactical advantage to the Garradors, or a disadvantage; the prison magnifies Leon's footsteps, but the tower is perfect for distracting him.
Sources
- ↑ Resident Evil Archives II. BradyGames. p. 86.
| ||||||||||||||||||||||