No edit summary |
No edit summary |
||
| (36 intermediate revisions by 14 users not shown) | |||
| Line 1: | Line 1: | ||
| − | A Warehouse wich was located in Uptown Raccoon City. It was used for shelter by Dario Rosso. Jill found herself in this warehouse just after escaping from her apartment. Jill later left the warehouse on her own after Dario insisted not to get out becouse he just witnessed the death of his daughter .{{Room Infobox |
||
| ⚫ | |||
| − | |image= |
||
| ⚫ | |||
| ⚫ | |||
| ⚫ | |||
| − | |area=Uptown |
||
| − | |links=[[Passage to Warehouse]], [[Warehouse Office]]}} |
||
| + | {{DISPLAYTITLE:Warehouse}} |
||
| − | However Jill continued to search a way out of town . Later that night she visits Warehouse once again to tell Dario that she has found a way out of the city (Trolley Car to Clock tower) but finds out that the Warehouse is now overrun and Dario has been killed (eaten). |
||
| + | {{Infobox room |
||
| − | The Warehouse was later remodelled into the [[Office Building Warehouse]] for [[Resident Evil Outbreak]], [[Resident Evil Outbreak File#2]] and [[Resident Evil: The Umbrella Chronicles|Resident Evil: The]] [[Resident Evil: The Umbrella Chronicles|Umbrella Chronicles]]. |
||
| ⚫ | |||
| + | |jp name = {{Nihongo|倉庫|sōko}} |
||
| + | |image = [[File:Resident Evil 3 background - Uptown - warehouse d - R10100.jpg]] |
||
| ⚫ | |||
| + | [[First Aid Spray|F. Aid Spray]] (x1)<br> |
||
| + | [[H. Gun Bullets (RE3)|H. Gun Bullets]] (x30) <small>(Hard Mode)</small><br> |
||
| + | [[Gun Powder A]] (x2)<br> |
||
| + | [[Gun Powder B]] (x2) |
||
| + | |files = [[Dario's Memo]] |
||
| ⚫ | |||
| ⚫ | |||
| + | |map = [[Uptown Raccoon City|Uptown]] |
||
| + | |links = [[Uptown/Street along apartment building|Street along apartment building]] (cutscene)<br> |
||
| + | [[Uptown/Warehouse office|Warehouse office]]<br> |
||
| + | [[Uptown/Warehouse back alley|Warehouse back alley]] |
||
| + | |game = ''Resident Evil 3: Nemesis'' |
||
| + | |OST = [[Hellish Agony]] (The Mercenaries) |
||
| + | }} |
||
| + | The '''warehouse''' is a room in ''[[Resident Evil 3: Nemesis]]''.<ref>''OFFICIAL GUIDEBOOK'', p.194-195</ref> It's an area in the Uptown section of [[Raccoon City]]. |
||
| + | ==Description== |
||
| − | [[File:001.jpg|thumb]] |
||
| + | A warehouse in Uptown Raccoon City. After [[Jill Valentine]] escapes from the burning apartment building, she finds shelter here along with Dario Rosso. |
||
| − | [[Category:Locations]] |
||
| + | |||
| + | ==Guide== |
||
| + | Upon entering the warehouse, one of Jill's monologues begins. Immediately after is a [[The Great Novelist (cutscene)|cutscene]]. |
||
| + | |||
| + | Dario locks himself inside of the container. The player can trigger an extra line of dialogue in some versions of the game by examining the container. |
||
| + | |||
| + | On the first level of the warehouse, there is an F. Aid Spray to the west. On Hard Mode, there is also a box of H. Gun Bullets in the safe nearby, indicated by the blinking green light. After obtaining the bullets, the light changes to red. |
||
| + | |||
| + | The stairway to the second floor leads to the [[Uptown/Warehouse office|warehouse office]]. |
||
| + | |||
| + | Upon obtaining the [[Backdoor Key]] from the office, the player can exit the warehouse by unlocking the door on the first level on the south end. |
||
| + | |||
| + | This door leads to the [[Uptown/Warehouse back alley|warehouse back alley]]. |
||
| + | |||
| + | ===After obtaining the Lockpick=== |
||
| + | Once the player has obtained the [[Lockpick]] from the [[S.T.A.R.S. office]], there will be four zombies in the warehouse. Three zombies are roaming the first floor and one zombie is lying down on the second floor balcony. The placement of the zombies on the first floor varies. |
||
| + | |||
| + | The container on the first floor is now open. There is a pair of Gun Powder A and B each inside, as well as the Dario's Memo file. |
||
| + | |||
| + | ==Examines== |
||
| + | {|class="wikitable" style="text-align: center" |
||
| + | |- |
||
| + | ! scope="col" |Location |
||
| + | ! scope="col" |Localization |
||
| + | ! scope="col" |Original script |
||
| + | |- |
||
| + | |Jill's monologue |
||
| + | |September 28. Daylight... The monsters have overtaken the city. Somehow... I'm still alive... |
||
| + | | |
||
| + | |- |
||
| + | |The container |
||
| + | |The container is locked from inside. |
||
| + | | |
||
| + | |- |
||
| + | |Alarm |
||
| + | |The alarm has already been used. |
||
| + | | |
||
| + | |- |
||
| + | |Forklifts |
||
| + | |A forklift for moving various types of cargo. |
||
| + | | |
||
| + | |- |
||
| + | |Stored products |
||
| + | |Defective products have been placed here. |
||
| + | | |
||
| + | |- |
||
| + | |Safe <small>(Hard Mode)</small> |
||
| + | |There's nothing left here. |
||
| + | | |
||
| + | |- |
||
| + | |Safe <small>(Easy Mode)</small> |
||
| + | |Nothing useful. |
||
| + | | |
||
| + | |- |
||
| + | |Windows |
||
| + | |It's eerily silent outside of the window. |
||
| + | | |
||
| + | |- |
||
| + | |Backdoor <small>(without key)</small> |
||
| + | |It's the backdoor exit. It's locked. |
||
| + | | |
||
| + | |- |
||
| + | |Backdoor <small>(with unexamined key)</small> |
||
| + | |You've used the <span style="color:#00A521;">Warehouse Key</span>. You no longer need this key. Will you discard it? (Y/N) |
||
| + | | |
||
| + | |- |
||
| + | |Backdoor <small>(with examined key)</small> |
||
| + | |You've used the <span style="color:#00A521;">Backdoor Key</span>. You no longer need this key. Will you discard it? (Y/N) |
||
| + | | |
||
| + | |} |
||
| + | |||
| + | ==Further notes== |
||
| + | *According to textures in the game, an unused chain item could be obtained within the safe in an earlier build of ''3''. |
||
| + | *Though Jill is seen entering though a different entrance to the warehouse, this door is not featured anywhere in the interior. |
||
| + | |||
| + | ==Gallery== |
||
| + | ===Cutscene=== |
||
| + | <gallery> |
||
| + | Resident Evil 3 Nemesis screenshot - Uptown - Warehouse scene 01.png|Jill looks outside. |
||
| + | Resident Evil 3 Nemesis screenshot - Uptown - Warehouse scene 02.png|Jill tries to reason with Dario. |
||
| + | Resident Evil 3 Nemesis screenshot - Uptown - Warehouse scene 03.png|Dario locks himself inside of the container. |
||
| + | Resident Evil 3 Nemesis screenshot - Uptown - Warehouse scene 04.png|Dario threatens Jill in the extra scene. |
||
| + | </gallery> |
||
| + | |||
| + | ===Gameplay=== |
||
| + | <gallery> |
||
| + | Resident Evil 3 Nemesis screenshot - Uptown - Warehouse pickup 01.png|Location of the F. Aid Spray. |
||
| + | Resident Evil 3 Nemesis screenshot - Uptown - Warehouse pickup 02.png|Location of the H. Gun Bullets <small>(Hard Mode)</small>. |
||
| + | Resident Evil 3 Nemesis screenshot - Uptown - Warehouse examine 01.png|Examines. |
||
| + | Resident Evil 3 Nemesis screenshot - Uptown - Warehouse examine 02.png |
||
| + | Resident Evil 3 Nemesis screenshot - Uptown - Warehouse examine 03.png |
||
| + | Resident Evil 3 Nemesis screenshot - Uptown - Warehouse examine 04.png |
||
| + | Resident Evil 3 Nemesis screenshot - Uptown - Warehouse examine 05.png |
||
| + | Resident Evil 3 Nemesis screenshot - Uptown - Warehouse examine 06.png |
||
| + | Resident Evil 3 Nemesis screenshot - Uptown - Warehouse examine 07.png |
||
| + | Resident Evil 3 Nemesis screenshot - Uptown - Warehouse examine 08.png |
||
| + | Resident Evil 3 Nemesis screenshot - Uptown - Warehouse examine 09.png |
||
| + | Resident Evil 3 Nemesis screenshot - Uptown - Warehouse examine 10.png |
||
| + | Resident Evil 3 Nemesis screenshot - Uptown - Warehouse examine 11.png |
||
| + | Resident Evil 3 Nemesis screenshot - Uptown - Warehouse examine 12.png |
||
| + | Resident Evil 3 Nemesis screenshot - Uptown - Warehouse examine 13.png |
||
| + | </gallery> |
||
| + | |||
| + | ===Backgrounds=== |
||
| + | <gallery> |
||
| + | Resident Evil 3 background - Uptown - warehouse a1 - R1010A.png|Gameplay |
||
| + | Resident Evil 3 background - Uptown - warehouse b1 - R10109.png |
||
| + | Resident Evil 3 background - Uptown - warehouse c1 - R10108.png |
||
| + | Resident Evil 3 background - Uptown - warehouse d - R10100.jpg |
||
| + | Resident Evil 3 background - Uptown - warehouse e - R10101.png |
||
| + | Resident Evil 3 background - Uptown - warehouse f - R1010C.png |
||
| + | Resident Evil 3 background - Uptown - warehouse g - R1010D.png |
||
| + | Resident Evil 3 background - Uptown - warehouse h - R10102.png |
||
| + | Resident Evil 3 background - Uptown - warehouse i - R10107.png |
||
| + | Resident Evil 3 background - Uptown - warehouse j - R10103.png |
||
| + | Resident Evil 3 background - Uptown - warehouse k - R10104.png |
||
| + | Resident Evil 3 background - Uptown - warehouse l - R10105.png |
||
| + | Resident Evil 3 background - Uptown - warehouse m - R10106.png |
||
| + | Resident Evil 3 background - Uptown - warehouse a2 - R10116.png|Opened container |
||
| + | Resident Evil 3 background - Uptown - warehouse b2 - R10115.png |
||
| + | Resident Evil 3 background - Uptown - warehouse c2 - R10114.png |
||
| + | Resident Evil 3 background - Uptown - warehouse n - R1010B.png |
||
| + | Resident Evil 3 background - Uptown - warehouse o - R10118.png|Cutscene |
||
| + | Resident Evil 3 background - Uptown - warehouse p - R10119.png |
||
| + | Resident Evil 3 background - Uptown - warehouse q - R1011A.png |
||
| + | Resident Evil 3 background - Uptown - warehouse r - R1010B.png |
||
| + | Resident Evil 3 background - Uptown - warehouse s - R10113.png |
||
| + | Resident Evil 3 background - Uptown - warehouse t - R10111.png |
||
| + | Resident Evil 3 background - Uptown - warehouse u - R1010E.png|Unused |
||
| + | Resident Evil 3 background - Uptown - warehouse v - R1010F.png |
||
| + | Resident Evil 3 background - Uptown - warehouse w - R10110.png |
||
| + | Resident Evil 3 background - Uptown - warehouse x - R10112.png |
||
| + | Resident Evil 3 background - Uptown - warehouse y - R10117.png |
||
| + | </gallery> |
||
| + | |||
| + | ===Artwork=== |
||
| + | <gallery> |
||
| + | Warehouse 2.jpg|Concept Art |
||
| + | </gallery> |
||
| + | |||
| + | ==Bibliography== |
||
| + | *{{Cite book|title=[[BIOHAZARD 3 LAST ESCAPE OFFICIAL GUIDEBOOK|BIOHAZARD 3 LAST ESCAPE OFFICIAL GUIDEBOOK (COMPLETE CONQUEST OF NEMESIS)]]|publisher= Famitsu|author=|authors=|editor=|page=|pages=|language=Japanese |isbn=4-7572-0613-5|year=1999}} |
||
| + | |||
| + | ==Sources== |
||
| + | ;References |
||
| + | |||
| + | <references/> |
||
| + | {{Resident Evil 3: Nemesis locations}} |
||
| + | [[Category:Resident Evil 3: Nemesis locations]] |
||
[[Category:Uptown district]] |
[[Category:Uptown district]] |
||
Revision as of 21:41, 11 March 2020
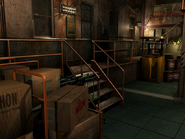
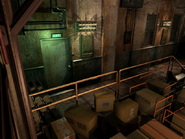
The warehouse is a room in Resident Evil 3: Nemesis.[1] It's an area in the Uptown section of Raccoon City.
Description
A warehouse in Uptown Raccoon City. After Jill Valentine escapes from the burning apartment building, she finds shelter here along with Dario Rosso.
Guide
Upon entering the warehouse, one of Jill's monologues begins. Immediately after is a cutscene.
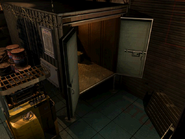
Dario locks himself inside of the container. The player can trigger an extra line of dialogue in some versions of the game by examining the container.
On the first level of the warehouse, there is an F. Aid Spray to the west. On Hard Mode, there is also a box of H. Gun Bullets in the safe nearby, indicated by the blinking green light. After obtaining the bullets, the light changes to red.
The stairway to the second floor leads to the warehouse office.
Upon obtaining the Backdoor Key from the office, the player can exit the warehouse by unlocking the door on the first level on the south end.
This door leads to the warehouse back alley.
After obtaining the Lockpick
Once the player has obtained the Lockpick from the S.T.A.R.S. office, there will be four zombies in the warehouse. Three zombies are roaming the first floor and one zombie is lying down on the second floor balcony. The placement of the zombies on the first floor varies.
The container on the first floor is now open. There is a pair of Gun Powder A and B each inside, as well as the Dario's Memo file.
Examines
| Location | Localization | Original script |
|---|---|---|
| Jill's monologue | September 28. Daylight... The monsters have overtaken the city. Somehow... I'm still alive... | |
| The container | The container is locked from inside. | |
| Alarm | The alarm has already been used. | |
| Forklifts | A forklift for moving various types of cargo. | |
| Stored products | Defective products have been placed here. | |
| Safe (Hard Mode) | There's nothing left here. | |
| Safe (Easy Mode) | Nothing useful. | |
| Windows | It's eerily silent outside of the window. | |
| Backdoor (without key) | It's the backdoor exit. It's locked. | |
| Backdoor (with unexamined key) | You've used the Warehouse Key. You no longer need this key. Will you discard it? (Y/N) | |
| Backdoor (with examined key) | You've used the Backdoor Key. You no longer need this key. Will you discard it? (Y/N) |
Further notes
- According to textures in the game, an unused chain item could be obtained within the safe in an earlier build of 3.
- Though Jill is seen entering though a different entrance to the warehouse, this door is not featured anywhere in the interior.
Gallery
Cutscene
Gameplay
Backgrounds
Artwork
Bibliography
- (in Japanese) BIOHAZARD 3 LAST ESCAPE OFFICIAL GUIDEBOOK (COMPLETE CONQUEST OF NEMESIS). Famitsu. 1999. ISBN 4-7572-0613-5.
Sources
- References
- ↑ OFFICIAL GUIDEBOOK, p.194-195


